getNEXT provides support for custom panels for two purposes:
- To present a custom user interface for Custom Metadata Data entry purposes.
- To present a custom user interface for the invocation of a Custom Automation.
A Custom Panel is a web form that is displayed in an iFrame within the getNEXT application. In the case of a Custom Metadata Data entry panel, this form typically would be used to communicate with a third-party system to support selection of values for a getNEXT custom metadata field. In the case of a Custom Automation panel, the form typically would be used to facilitate the export of a job’s output file to a third-party system.
Configuring a Custom Data Entry Panel
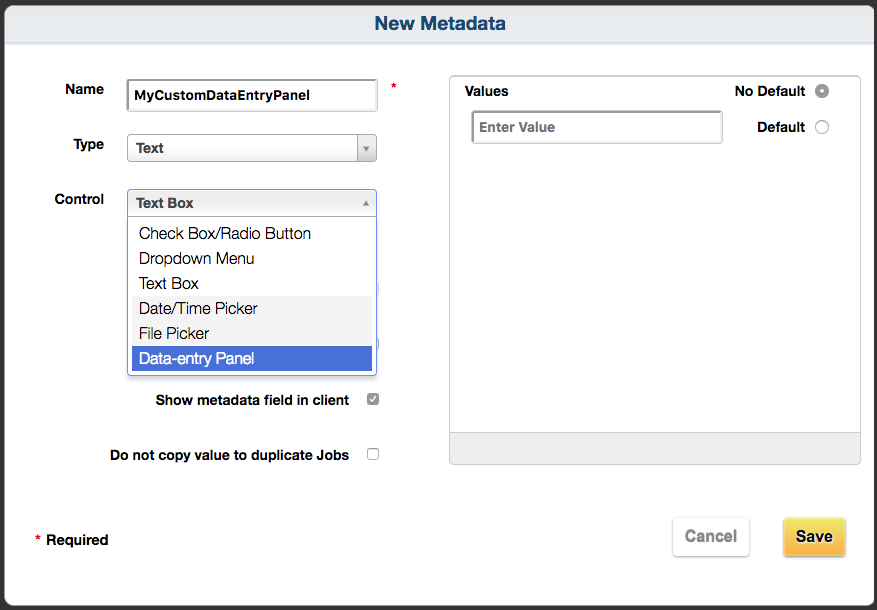
A Custom Data entry panel can be hosted either on a third-party server or directly by getNEXT. When creating a Custom Metadata Field in the getNEXT Admin, if you set the Type to “Text”, one of the options in the Control drop-down menu will be “Data-entry Panel”:
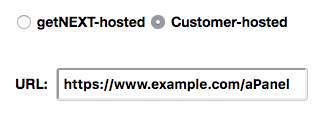
You can then either enter a URL that points to where your panel is hosted:
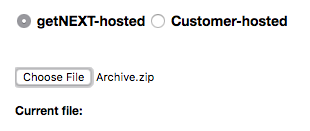
Or, you can upload a zip file of your custom panel files (packaged as a standalone website whose default page is index.html):
Viewing a Custom Data Entry Panel Field
Once a Custom Metadata Field has been configured to present a Custom Data entry panel and that field has been associated with a getNEXT Profile, a user can access the custom panel either via the Digital Editor Check-in Dialog or via the Custom Metadata section of the Job Details Pane within the Web Client.
Fields that offer a Custom Data entry panel will display an associated icon that a user can click to invoke the iframe and load the Custom Panel. (We are working on adding support for presenting these custom metadata panels in the check-in dialog of the web client as well as in the other client applications where Custom Metadata can be edited.)
Custom Data Entry Panel Field in the getNEXT Web Client

Once a user enters edit mode:
![]()
The user can click the![]() icon to launch the iframe, and load the custom panel.
icon to launch the iframe, and load the custom panel.
Custom Data Entry Panel Field in the Digital Editor Checkin Dialog
As in the Web Client, the user can click the![]() icon to launch the iframe, and load the custom panel.
icon to launch the iframe, and load the custom panel.
Configuring a Custom Automation Panel
A Custom Automation Panel can currently only be hosted on a third-party server, but we plan to support the ability for getNEXT to host these as well. To create an automation, you must use the getNEXT Rest API. We offer some example code for how this can be accomplished via our getNEXT WordPress Plugin that presents a custom panel within the getNEXT Web Client for sending a Digital Editor post to a WordPress server.
Viewing a Custom Automation Panel
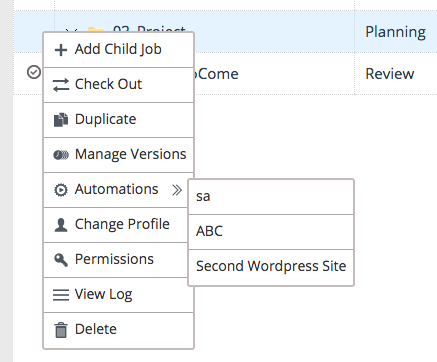
Once a Custom Automation has been configured and that automation has been associated with a getNEXT Profile, a user can access the Custom Automation Panel via the context-sensitive menu on a job. If there are no Automations associated with the job’s profile, then this menu item will no be presented in the menu. Simply select the automation in the sub-menu to launch the iframe and load the custom panel.
getNEXT Custom Panel Communication via Events
Communication between a Custom Panel and the getNEXT application is performed via window.postMessage(). Using this technique, an event listener in getNEXT listens for messages emitted by the custom panel, and the custom panel can likewise register a listener for events emitted by the getNEXT application. Soon after a Custom Panel is invoked through the getNEXT user interface, your code can emit an event to the getNEXT Application to provide the custom panel with context-specific job details. Here’s how you would set up a listener for that in your custom panel’s javascript:
var formValues = null;
parent.postMessage("fetch_job_meta_data", document.referrer);
window.addEventListener("message", function el(e) {
    if (e.data && typeof e.data !== "string" && e.data.eventType === 'init') {
        formValues = JSON.parse(JSON.stringify(e.data));
        window.removeEventListener("message", el, false);
    }
});
When a user hits Submit or Cancel on a Custom Data entry panel, the form should send feedback to the getNEXT Application to either set or maintain the value for the corresponding field. Here’s an example that shows how to do that:
/**
 * A handler function to prevent default submission and run our custom script.
 * @param  {Event} event  the submit event triggered by the user
 * @return {void}
 */
var handleFormSubmit = function handleFormSubmit(event) {
    // Stop the form from submitting since we’re handling that with AJAX.
    event.preventDefault();

    // Call our function to get the form data. getFormValues() is not shown in this example.
    var data = getFormValues();

    // Send the data to the parent
    if (document.referrer) {
        parent.postMessage(data, document.referrer);
    }
};
var handleCancel = function handleCancel(event) {
    // Call our function to get the original data. getOldValue() is not shown in this example.
    var data = getOldValue();
    if (document.referrer) {
        parent.postMessage(data, document.referrer);
    }
};
/*
 * This is where things actually get started. We find the form element using
 * its class name, then attach the `handleFormSubmit()` function to the
 * `submit` event and attach the `handleCancel()` function to the `cancel` event.
 */
var form = document.getElementById("theForm");
form.addEventListener("submit", handleFormSubmit);
form.addEventListener("cancel", handleCancel);
When a user hits Submit or Cancel on a Custom Automation panel, the form should send feedback to the getNEXT Application to log the results of the automation attempt. Here’s an example that shows how to do that:
/**
 * A handler function to prevent default submission and run our custom script.
 * @param  {Event} event  the submit event triggered by the user
 * @return {void}
 */
var handleFormSubmit = function handleFormSubmit(event) {
    // Stop the form from submitting since we’re handling that with AJAX.
    event.preventDefault();

    // Initialize the response.
    var data = {};
    data.action = "send";
    // Set data.success to true if the automation was successful or false if it was not.
    data.success = true;
    // Send the data to the parent
    if (document.referrer) {
        parent.postMessage(data, document.referrer);
    }
};
var handleCancel = function handleCancel(event) {
    // Initialize the response.
    var data = {};
    if (document.referrer) {
        parent.postMessage(data, document.referrer);
    }
};
/*
 * This is where things actually get started. We find the form element using
 * its class name, then attach the `handleFormSubmit()` function to the
 * `submit` event and attach the `handleCancel()` function to the `cancel` event.
 */
var form = document.getElementById("theForm");
form.addEventListener("submit", handleFormSubmit);
form.addEventListener("cancel", handleCancel);
Confirming that the call to an Automation Form is coming from getNEXT
Since getNEXT is calling a Custom Automation Panel that is not necessarily hosted by getNEXT, developers of a Custom Automation Panel need to make sure that a call is legitimately coming from getNEXT. To support this verification process, the request for a remote form will include a URL parameter with a one-time token (x-Source-Verification-Token) supplied by the getNEXT Server. The recipient remote form can then securely call a method in the getNEXT API with the one-time token to verify the Web Client request (see /api/1/info/verifytoken (POST)).
If verification is successful, the form can proceed with it’s expected functionality; conversely, a verification failure indicates that it should not proceed. In either case, upon the verification attempt, getNEXT will discard the one-time token.
Examples
An example Custom Metadata Data-Entry Panel can be found at https://github.com/getNEXT/customMetadataDateEntryPanel_calculatorExample.
An example Custom Automation Panel can be found at https://github.com/getNEXT/tewppi.